
Do you remember the first time you watched a video that left you breathless?
Maybe it was a cinematic masterpiece, a viral dance challenge, or a heartfelt vlog that spoke directly to your soul.
Whatever it was, it’s likely that the video’s captivating animations played a significant role in leaving a lasting impression.
As a creator, you want to evoke that same emotional response from your audience.
I know. I have been there.
But let’s face it – video editing can be challenging, especially when it comes to working with keyframes.
That’s why I’m happy to share this tutorial on how to add keyframes in CapCut on PC.
With CapCut’s user-friendly interface and our step-by-step guide, you’ll be well on your way to shape videos that mesmerize, inspire, and leave a lasting impact. Now, grab a cup of coffee, get comfortable, and let’s get into it.
What are keyframes?
Keyframes are like bookmarks in a video.
In animation, a keyframe is a specific point in time that defines a particular action, movement, or change in a video.
It’s a crucial element that helps bring your visuals to life. Think of keyframes as milestones that mark the beginning and end of a specific animation or effect.
Example:
So you’re editing a video of a sunset. You want the sun to move from the top of the screen to the bottom. Here’s how these can help:
- You set a keyframe at the beginning of the video (top of the screen).
- You set another keyframe at the end of the video (bottom of the screen).
- Now, the video editing software knows to move the sun from top to bottom between these two keyframes.
Think of it like this:
Keyframes are like saying:
“Hey, I want the sun to be here at the start and at the end. Fill in the rest.”
Keyframes in Capcut
While there’s no shortage of video editing software out there, CapCut stands out for its simplicity and user-friendly interface. Its features make it an excellent choice for beginners and seasoned editors alike who want to create stunning videos without the steep learning curve.
In CapCut, keyframes are used to control the animation and effects of your video.
By setting keyframes, you can:
- Create complex animations and effects.
- Control the movement and position of objects.
- Define the start and end points of an animation.
- Adjust the opacity, scale, and rotation of elements.
CapCut’s keyframe feature allows you to:
- Copy and paste keyframes to save time and effort.
- Use the graph editor to fine-tune keyframe animations.
- Set keyframes for specific properties like position and scale.
You can even add keyframes to your captions to design their animation the way you want it to be. Adjust the easing and interpolation of keyframes for smooth animations.
Keyframe vs. Non-Keyframe Animation
Here are the key differences between keyframe and non-keyframe animations:
| Characteristics | Keyframe Animation | Non-Keyframe Animation |
| Control | Precise control over animation | Limited control, relies on algorithms |
| Customization | Highly customizable | Less customizable |
| Time | Time-consuming, requires manual setting | Faster, automated process |
| Complexity | Suitable for complex animations | Suitable for simple animations |
| Examples | Transitions, motion graphics, color correction | Auto-generated animations, primary effects |
| User Input | Requires manual keyframe setting | Minimal user input is required |
| Flexibility | Allows for changes and adjustments | Limited flexibility, challenging to make changes |
| Output | High-quality, precise animation | Good-quality but less precise animation |
| Software | Requires advanced software like Adobe After Effects, CapCut | Can be done with essential software like iMovie, DaVinci Resolve |
| Skill Level | Requires intermediate to advanced skills | Suitable for beginners |
| Use Cases | Film, TV, commercials, high-end videos | Social media, vlogs, essential videos |
Examples of Keyframe Usage in Video Editing
These are essential in video editing, and here are some examples of their usage:
- Transitions: This helps create smooth transitions between clips, such as fading in or out, sliding, or rotating.
- Motion graphics control the movement and animation of text, logos, and other graphical elements.
- Color correction: Keyframes enable you to adjust color settings at specific points in time, creating a dynamic color scheme.
- Audio ducking: moreover, these help balance audio levels, ensuring clear dialogue and background music isn’t overpowering.
How to Add Keyframe in Capcut on PC?
CapCut offers a robust keyframe feature that allows users to add keyframes to various media types, including videos, images, Audio, and texts. Moreover, this feature enables you to control and animate various properties, such as position, size, blend, opacity, and audio volume, which create endless creative possibilities.
How to Use Keyframes to Design Images and Videos?
The process for adding keyframes to images is similar, with the option to add multiple keyframes to a video, giving you complete control over your animation.
To add keyframes in CapCut on PC, follow these steps:
Step 1: Import and add to Timeline
Upload a video and image to CapCut and add them to the timeline.
Step 2: Playhead Placement
Click on the video track and drag the play head to the precise starting point of the clip where you want to alter parameters, marking the beginning of your animation.
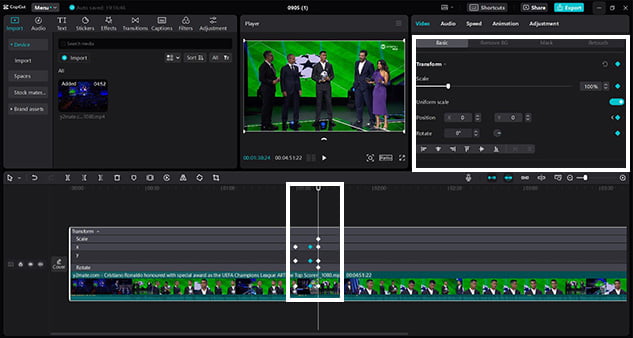
Step 3: Keyframe Addition
Navigate to the video basic panel on the preview window’s right side. To change the size and position of a scene, click the “Add keyframe” icon next to Position & Size, adding your first keyframe.
Step 4: Defining the End Point
Drag the playhead to the end of the clip, marking the conclusion of your animation. Click the icon again to add another keyframe, creating a seamless transition.
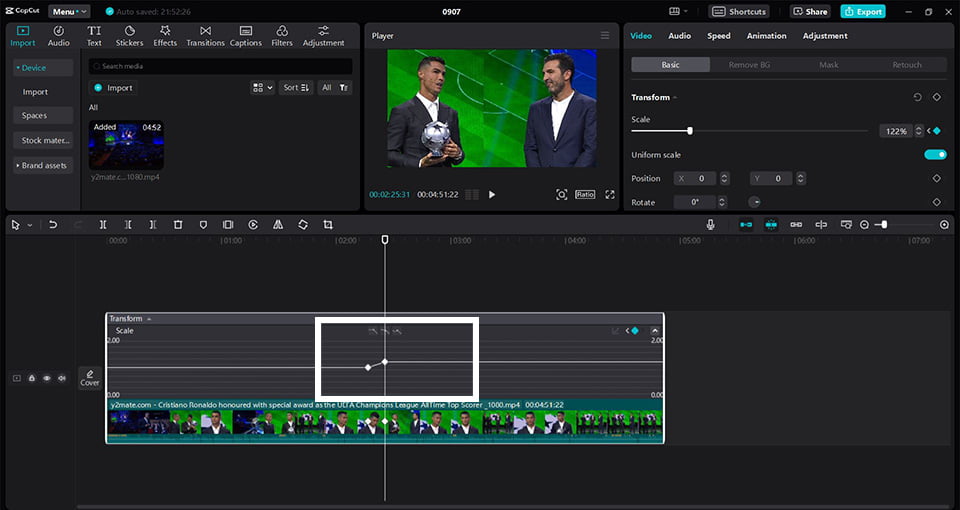
Step 5: Parameter Adjustment
With two keyframes in place, adjust the video’s size and position by tweaking parameters or directly dragging and dropping its edge to change its position and size.
Step 6: Preview and Refine
Preview the video after making adjustments refining your animation until it meets your creative vision.

How do you add Keyframes in CapCut to Design Audio?
Want to control the volume of your Audio clip in CapCut?
Follow these easy steps:
Step 1: Add Audio to Timeline
Add your audio file to CapCut and put it on the timeline.
Step 2: Find the Starting Point
Drag the playhead to where you want to start changing the volume. Then, go to the audio settings and click the “Add keyframe” icon next to “Volume” to add your first keyframe.
Step 3: Find the Ending Point
Drag the playhead to where you want to stop changing the volume. Click the icon again to add your second keyframe.
Step 4: Adjust the Volume
Now, you can adjust the volume of your audio clip between the two keyframes.

How do you add Keyframes in CapCut to Design Texts?
Want to customize your text in CapCut? Follow these easy steps:
Step 1: Add Text to Timeline
Add your text to CapCut and put it on the timeline.
Step 2: Find the Starting Point
Drag the playhead to where you want to start changing the text. To change the text color, click the “Add keyframe” icon next to “Color” to add your first keyframe.
Step 3: Find the Ending Point
Drag the playhead to where you want to stop changing the text. Click the icon again to add your second keyframe.
Step 4: Change Text Color
Now, you can change the color of your text between the two keyframes.

Adding keyframes in CapCut’s mobile app is easy. Here’s how:
Step 1: Start a New Project
Open CapCut on your phone and begin a new project.
Step 2: Select Your Video Clip
Import the video clip you want to edit and tap on it to select it.
Step 3: Enable Keyframe Editing
Tap the keyframe icon at the bottom of the screen to start keyframe editing. This adds the first keyframe at the beginning of the clip.
Step 4: Set Keyframes and Adjust Parameters
Move the playhead to where you want the animation to end or change. Adjust the clip’s parameters like size and position. CapCut will automatically add a new keyframe to mark the change.
Step 5: Add More Keyframes
Repeat step 4 to create more keyframes and changes to your clip.
Step 6: Preview and Export
Preview the animation and export the video when you’re done!
Following these steps, you can easily add keyframes to CapCut’s mobile app and take your video editing skills to the next level.
Advanced Keyframe Techniques
1. Easing and Interpolation
Easing and interpolation are potent tools for controlling the animation between keyframes. Easing allows you to adjust the acceleration and deceleration of animations, while interpolation defines how keyframes are connected. Changing these settings will enable you to create smooth, natural-looking animations that enhance your video.
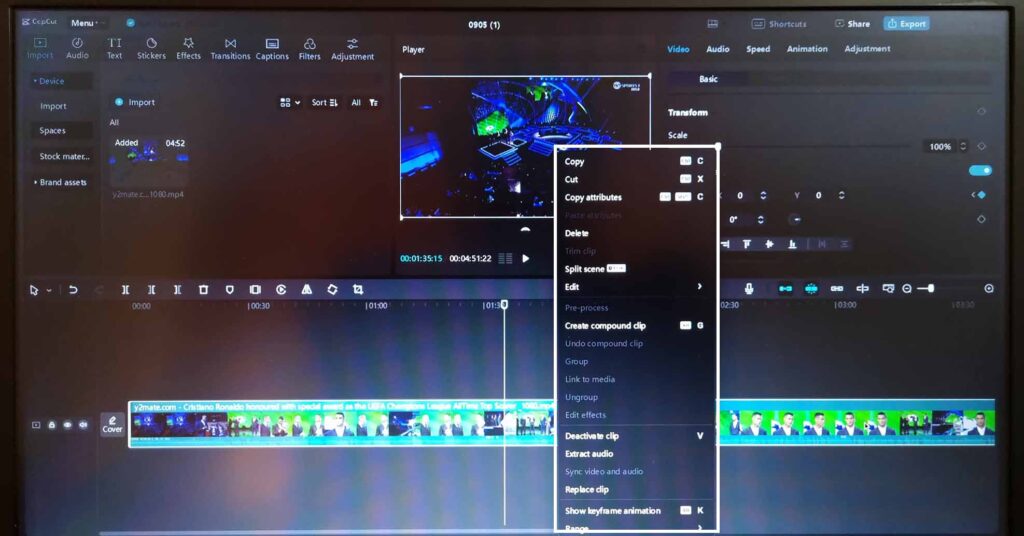
Just right click on the video after adding keyframes, you will see the option of keyframe animation. After clicking on that you will see all of easing and interpolation options.
2. Keyframe Interpolation Modes
CapCut offers various keyframe interpolation modes, including Linear, Bezier, and Hold. Linear interpolation connects keyframes with straight lines, while Bezier interpolation creates smooth, curved connections. Hold interpolation maintains a value until the next keyframe. Each mode has its own unique applications, and experimenting with different modes can help you achieve the desired effect.
3. Using the Graph Editor
The graph editor is a visual representation of keyframe values over time. By adjusting the curves in the graph editor, you can fine-tune your animations with precision. The graph editor is handy for creating complex animations, allowing you to visualize and adjust multiple keyframes simultaneously.
4. Creating Complex Animations
To create complex animations, combine multiple keyframe types, such as position, scale, and rotation. You can create sophisticated animations that improve your video editing skills.
Tips for Working with Keyframes in CapCut
1. Plan Your Animation
Before adding keyframes, plan your animation by storyboarding or sketching out your ideas. This will help you visualize the flow of your animation and ensure a smooth keyframe workflow.
2. Use the Right Interpolation Mode
Choose the suitable interpolation mode for your animation. For example, if you’re animating a logo, use Bezier interpolation for a smooth, curved motion. If you’re animating a text pop-up, use Hold interpolation to maintain a consistent size and position.
3. Experiment with Easing
Easing can make or break an animation. Experiment with different easing options, such as Ease In, Ease Out, or Ease In-Out, to find the perfect fit for your animation. For instance, Ease In-Out can create a natural-looking animation for a bouncing ball.
4. Use Keyframe Layers
Organize your keyframes using layers. This helps you manage complex animations and makes adjusting specific parts of your animation easier. For example, you can have separate layers for position, scale, and rotation.
5. Refine with the Graph Editor
Use the graph editor to fine-tune your keyframe curves. This allows you to adjust the animation’s speed, acceleration, and deceleration. For example, you can use the graph editor to create a smooth acceleration for a car animation.
6. Preview and Adjust
Preview your animation regularly and adjust your keyframes as needed. This ensures your animation looks smooth and natural. For instance, change the keyframe spacing or interpolation mode if your animation looks jerky. By following these tips, you’ll become a keyframe master in CapCut and create stunning animations that elevate your video editing skills!
Conclusion
Keyframes help you control animations and effects in CapCut. They make your videos look smooth and professional.
To get better at using keyframes, practice and try new things. Don’t be afraid to experiment and try new ideas.
Using keyframes will improve your video editing skills. You’ll be able to create outstanding visuals and tell great stories.
Start using keyframes in CapCut today and see the difference.
Are you tired of creating videos that feel static and lifeless?
Do you want to take your video editing skills to the next level and create animations that captivate and inspire your audience?
As a seasoned video editor, I can assist you in crafting mesmerizing and high-quality videos that attract your audience.
Together, we can:
- Enhance your visual style and aesthetic.
- Improve your pacing and timing for maximum impact.
- Refine your editing technique for a polished, professional finish.
- Develop a storytelling strategy that resonates with your audience.
- Add motion graphics, animations, and effects to elevate your content
Let’s work together to take your video content to new heights and leave a lasting impression on your viewers.